TensorFlow on a GTX 1080


Ubuntu 16.03 安装 CUDA、NVIDIA驱动,CUDNN及GPU版TensorFlow。

GPU 支持的TensorFlow让算力大幅提升,但是安装好一切支持却不那么容易!其实主要是三个东西:

  1. Nvidia 驱动:显卡驱动
  2. CUDA Toolkit CUDA工具箱
  3. CUDNN:CUDA Deep Neural Network library 神经网络库函数

    依赖

1
2
3
4
5
6
7
8
9
10
11
12
13
$ sudo apt-get update
$ sudo apt-get install \
freeglut3-dev \
g++-4.9 \
gcc-4.9 \
libglu1-mesa-dev \
libx11-dev \
libxi-dev \
libxmu-dev \
nvidia-modprobe \
python-dev \
python-pip \
python-virtualenv

安装Nvidia驱动

1
2
3
4
$ sudo apt-get purge nvidia-* 删除nvidia 之前的
$ sudo add-apt-repository ppa:graphics-drivers/ppa
$ sudo apt-get update
$ sudo apt-get install nvidia-384

可在Proprietary GPU Drivers : “Graphics Drivers” team查看当前稳定版本Nvidia驱动,如笔者当前(2017-11-13)版本是‘nvidia-384’。

接下来重启$ sudo reboot
重启后,检测Nvidia驱动安装情况,

1
$ cat /proc/driver/nvidia/version
1
2
NVRM version: NVIDIA UNIX x86_64 Kernel Module  384.98  Thu Oct 26 15:16:01 PDT 2017
GCC version: gcc version 5.4.0 20160609 (Ubuntu 5.4.0-6ubuntu1~16.04.4)

显示Nvidia’s system management interface:

1
$ sudo nvidia-smi
1
2
3
4
5
6
7
8
9
10
11
12
13
14
15
16
17
18
+-----------------------------------------------------------------------------+
| NVIDIA-SMI 384.98 Driver Version: 384.98 |
|-------------------------------+----------------------+----------------------+
| GPU Name Persistence-M| Bus-Id Disp.A | Volatile Uncorr. ECC |
| Fan Temp Perf Pwr:Usage/Cap| Memory-Usage | GPU-Util Compute M. |
|===============================+======================+======================|
| 0 GeForce GTX 1080 Off | 00000000:01:00.0 On | N/A |
| 0% 47C P8 12W / 215W | 7992MiB / 8112MiB | 2% Default |
+-------------------------------+----------------------+----------------------+

+-----------------------------------------------------------------------------+
| Processes: GPU Memory |
| GPU PID Type Process name Usage |
|=============================================================================|
| 0 994 G /usr/lib/xorg/Xorg 193MiB |
| 0 1889 G compiz 151MiB |
| 0 5068 C /home/frank/anaconda3/bin/python 7643MiB |
+-----------------------------------------------------------------------------+

设置GCC 4.9为默认

1
2
3
4
5
$ sudo update-alternatives --install /usr/bin/gcc gcc /usr/bin/gcc-4.9 10
$ sudo update-alternatives --install /usr/bin/gcc gcc /usr/bin/gcc-4.9 20

$ sudo update-alternatives --install /usr/bin/g++ g++ /usr/bin/g++-4.9 10
$ sudo update-alternatives --install /usr/bin/g++ g++ /usr/bin/g++-4.9 20

安装CUDA

当前虽然CUDA-9.0已经发布,但是TensorFlow默认编译版本还是基于CUDA-8.0的,我们在这里CUDA Toolkit 8.0 - Feb 2017 | NVIDIA Developer下载runfile
Screen Shot 2017-11-13 at 18.35.28

使用如下安装

1
sudo cuda_8.0.61_375.26_linux.run --override

安装时记得

1
2
3
4
5
6
7
8
9
10
11
12
13
14
15
16
17
18
19
20
21
22
23
24
25
26
27
28
29
30
31
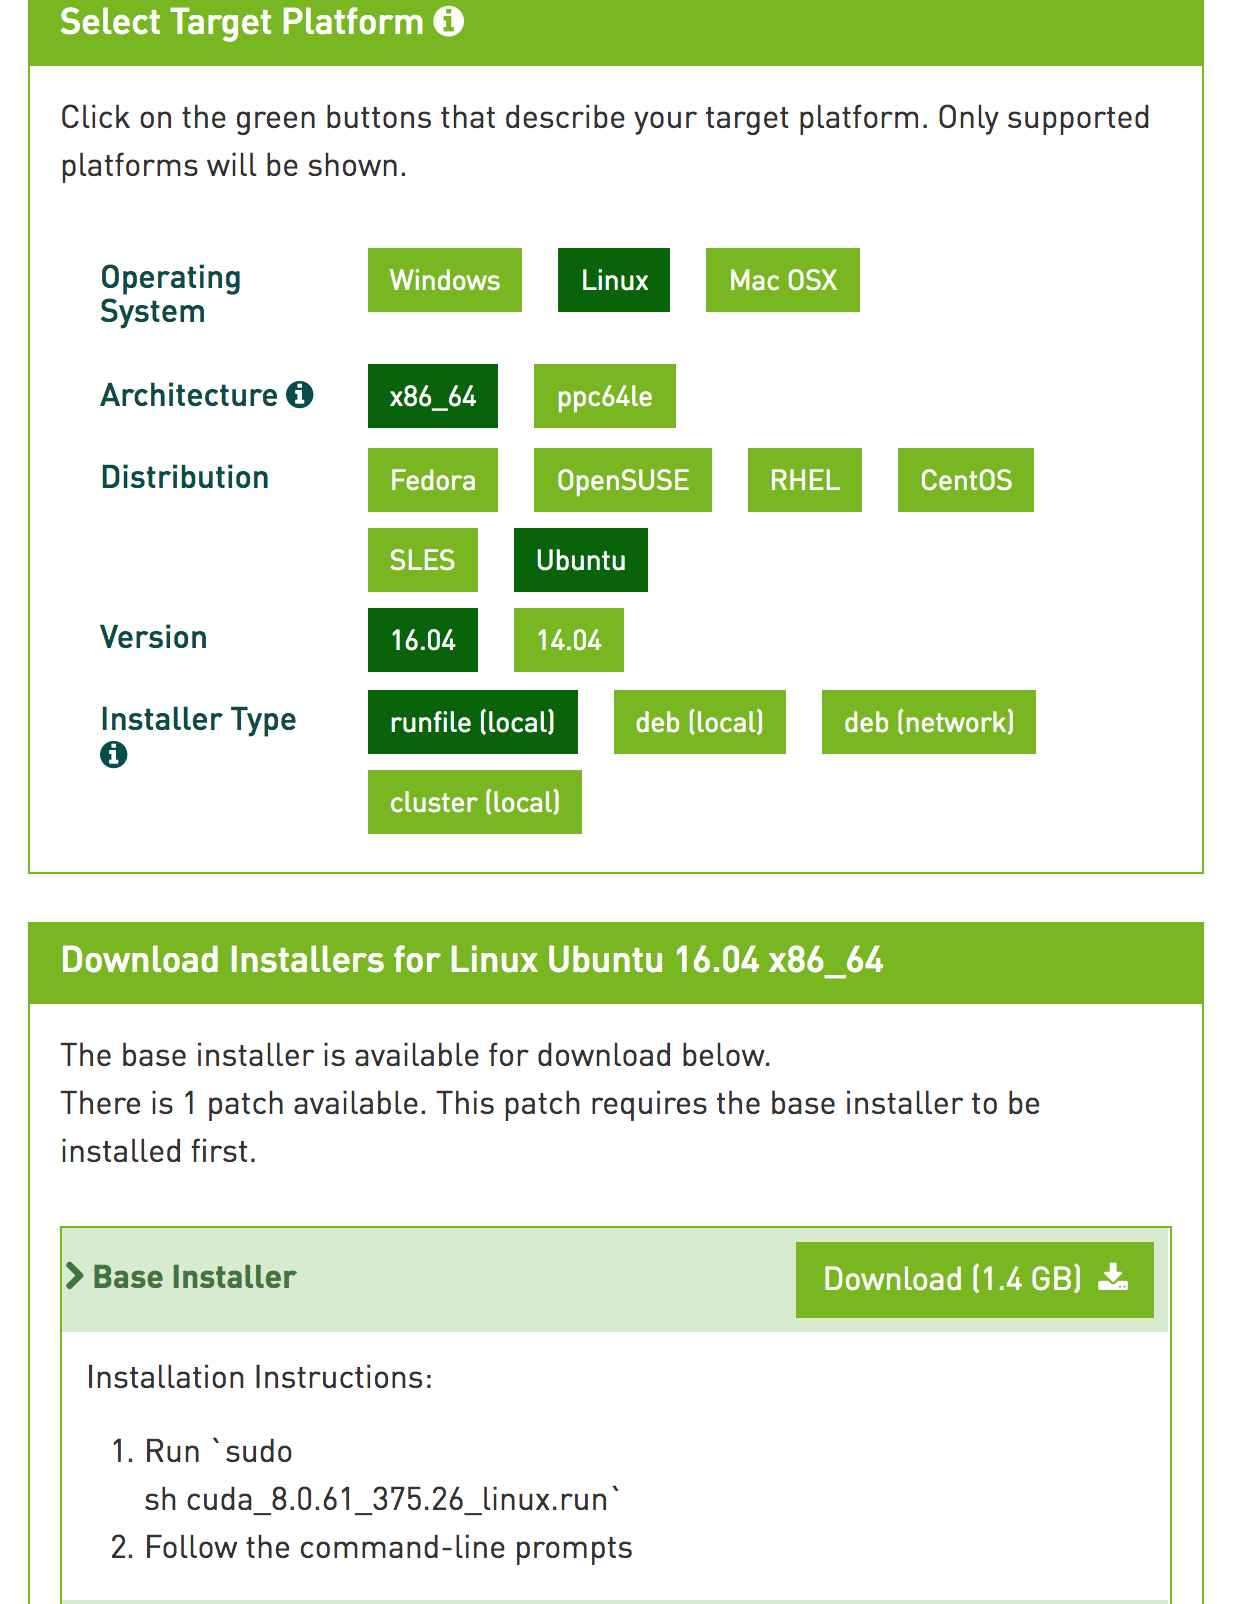
Do you accept the previously read EULA? (accept/decline/quit): accept
You are attempting to install on an unsupported configuration. Do you wish to continue? ((y)es/(n)o) [ default is no ]: yes
Install NVIDIA Accelerated Graphics Driver for Linux-x86_64 352.39? ((y)es/(n)o/(q)uit): no
Install the CUDA 8.0 Toolkit? ((y)es/(n)o/(q)uit): yes
Enter Toolkit Location [ default is /usr/local/cuda-8.0 ]:
Do you want to install a symbolic link at /usr/local/cuda? ((y)es/(n)o/(q)uit): yes
Install the CUDA 8.0 Samples? ((y)es/(n)o/(q)uit): no
Installing the CUDA Toolkit in /usr/local/cuda-8.0 ...

===========
= Summary =8.0
===========

Driver: Not Selected
Toolkit: Installed in /usr/local/cuda-8.0
Samples: Not Selected

Please make sure that
- PATH includes /usr/local/cuda-8.0/bin
- LD_LIBRARY_PATH includes /usr/local/cuda-8.0/lib64, or, add /usr/local/cuda-8.0/lib64 to /etc/ld.so.conf and run ldconfig as root

To uninstall the CUDA Toolkit, run the uninstall script in /usr/local/cuda-8.0/bin
To uninstall the NVIDIA Driver, run nvidia-uninstall

Please see CUDA_Installation_Guide_Linux.pdf in /usr/local/cuda-8.0/doc/pdf for detailed information on setting up CUDA.

***WARNING: Incomplete installation! This installation did not install the CUDA Driver. A driver of version at least 352.00 is required for CUDA 8.0 functionality to work.
To install the driver using this installer, run the following command, replacing <CudaInstaller> with the name of this run file:
sudo <CudaInstaller>.run -silent -driver

Logfile is /tmp/cuda_install_14557.log

记得上面这里也有个询问你是否安装Nvidia驱动的地方,因为我们前面已经安装了最新的版本,这里当然选择no。

添加环境变量

1
2
3
$ echo 'export PATH=/usr/local/cuda/bin:$PATH' >> ~/.bashrc
$ echo 'export LD_LIBRARY_PATH=/usr/local/cuda/lib64:$LD_LIBRARY_PATH' >> ~/.bashrc
$ source ~/.bashrc

查看CUDA compiler

1
$ nvcc -V
1
2
3
4
nvcc: NVIDIA (R) Cuda compiler driver
Copyright (c) 2005-2016 NVIDIA Corporation
Built on Tue_Jan_10_13:22:03_CST_2017
Cuda compilation tools, release 8.0, V8.0.61

安装CUDA Deep Neural Network library :CUDNN

在此处下载cuDNN Download | NVIDIA Developer,可能需要我们注册账号登录。
选择适配CUDA的版本,以及cuDNN v7.0 Library for Linux,这个就是个targz文件。
Screen Shot 2017-11-13 at 18.42.51

接下来操作就是把cudnn的几个库放到cuda里面:

1
2
3
4
$ tar xvf cudnn-8.0-linux-x64-v7.tgz
$ sudo cp cuda/include/cudnn.h /usr/local/cuda/include/
$ sudo cp cuda/lib64/libcudnn* /usr/local/cuda/lib64/
$ sudo chmod a+r /usr/local/cuda/lib64/libcudnn*

TensorFlow安装

pip install --upgrade tfBinaryURL 即可,这里的tfBinaryURL可在Installing TensorFlow on Ubuntu  |  TensorFlow选取,例如我这里选取Python3.6的GPU Support:

Screen Shot 2017-11-13 at 18.47.45

验证TensorFlow安装

1
2
3
4
5
6
7
8
9
10
11
12
13
14
In [1]: import tensorflow as tf

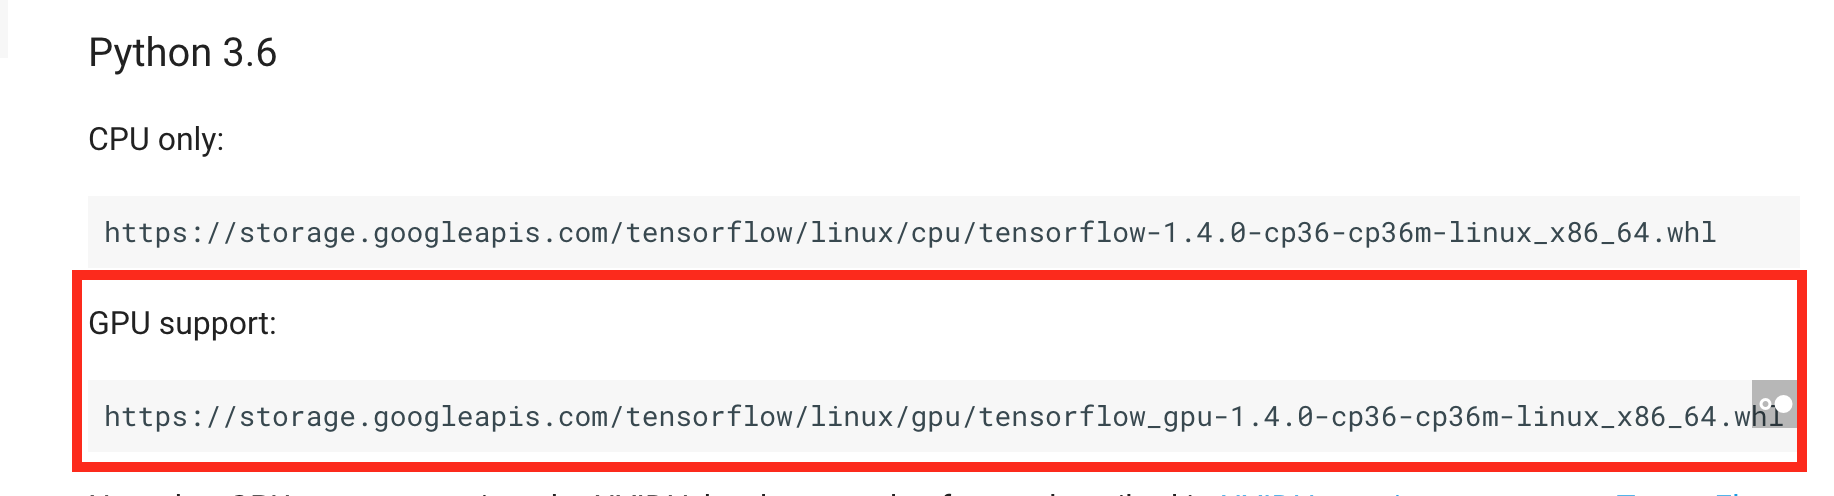
In [2]: sess = tf.Session(config=tf.ConfigProto(log_device_placement=True))
2017-11-13 18:54:59.081831: I tensorflow/core/platform/cpu_feature_guard.cc:137] Your CPU supports instructions that this TensorFlow binary was not compiled to use: SSE4.1 SSE4.2 AVX AVX2 FMA
2017-11-13 18:54:59.186280: I tensorflow/stream_executor/cuda/cuda_gpu_executor.cc:892] successful NUMA node read from SysFS had negative value (-1), but there must be at least one NUMA node, so returning NUMA node zero
2017-11-13 18:54:59.186604: I tensorflow/core/common_runtime/gpu/gpu_device.cc:1030] Found device 0 with properties:
name: GeForce GTX 1080 major: 6 minor: 1 memoryClockRate(GHz): 1.86
pciBusID: 0000:01:00.0
totalMemory: 7.92GiB freeMemory: 7.46GiB
2017-11-13 18:54:59.186617: I tensorflow/core/common_runtime/gpu/gpu_device.cc:1120] Creating TensorFlow device (/device:GPU:0) -> (device: 0, name: GeForce GTX 1080, pci bus id: 0000:01:00.0, compute capability: 6.1)
Device mapping:
/job:localhost/replica:0/task:0/device:GPU:0 -> device: 0, name: GeForce GTX 1080, pci bus id: 0000:01:00.0, compute capability: 6.1
2017-11-13 18:54:59.216573: I tensorflow/core/common_runtime/direct_session.cc:299] Device mapping:
/job:localhost/replica:0/task:0/device:GPU:0 -> device: 0, name: GeForce GTX 1080, pci bus id: 0000:01:00.0, compute capability: 6.1

如上,打印出这些信息就证明安装成功啦!

CUDA ToolKit 8.0 升级到9.0指南

主要就是需要下载CUDA ToolKit 9.0 的安装包,和8.0一样安装,注意下面的四步骤我们只需要第二步(ToolKit)和第四步(创建软链接,原有的是指向8.0的)

因为CUDNN被放在CUDA ToolKit 8.0内,所有这里我们需要重新下载CUDNN并解压到CUDA ToolKit 9.0文件夹内,

再在Installing TensorFlow on Ubuntu  |  TensorFlow

1
2
pip install --ignore-installed --upgrade \
<url>

url选取如下的你需要的python版本的GPU网址即可。